Home MyStudio Family MyStudio

Friday, April 6, 2012

Happy Easter

Just wanted to say Happy Easter to everyone!

I received a new cake pan for my birthday that is in the shape of beautiful Easter Eggs with design imprinted in the pan! Here is a photo to tantalize your taste buds of the finished cakes! These are the mini egg shaped carrot cakes I baked today for Easter Monday dessert! Carrot cake it one cake that tastes better if baked a day or two before the day... so I did them today and decorated them with homemade cream cheese icing and some pink sugar!


I also did some cupcakes with lots more icing on the top for those who just cannot get enough of that cream cheese! Plus those cupcakes I added nuts and fruit to. You cannot have that in the egg shaped ones or you won't get the nice smooth outer shell that you need to see the decorative shape of the eggs!

Have a wonderful Easter eveyone! Big hugs from our family to yours!

New Ribbons for my Vicotria Ribbonwork!

Went shopping the other day and purchased some new ribbons! I love doing my Victoria Ribbonwork which you see on many of my bears and it is always a joy to add more to the collection of ribbons!


Tuesday, April 3, 2012

Fur Friday - Sewing Lesson 6

Hello Everyone: Because I am late with my Fur Friday posts I am posting today to get caught up as I know some of you have been writing that you are going to start your fur bears and are enjoying the posts so why make you wait for the sake of the name of a day!

I have to say that this has been a fun experience up till this point at which time I think I am going to have throw in the towel! First I cannot stop sneezing! My face is super itchy as are my eyes and I can't stop sneezing! A mask... I need a mask and glasses and possibly a pair of gloves and maybe some duck tape... hahaha The bottom line is sometimes we are not meant to make real fur bears.


Here is another issue and maybe Nancy will write to tell us all what is going wrong;
I sewed my bear together only to turn the bear to the right side and see that everywhere I stitched has now turned into a perforated edge which has released itself and come apart. Big tears everywhere. So what this means is that even if I can get the bear resewn it is now going to be much smaller as I lost my seam allowance.


I followed the instructions: I changed my needle to my glover (leather needle)
I used a 1/4 inch seam allowance also. I double seam my bears... possibly this is the issue? Maybe if I increased the stitch length on the machine?


The other option of course is to hand sew the bear which I do on all my miniatures.This would allow me to control my tension which might be what is needed for this coat! I am honestly not sure and hand sewing real fur bears is not an option for me due to the sneezing...This is what happened to me with my non lined vintage bear that I posted for you all to see before... Gilbert! Remember, I told you all his seams tore the vintage mohair fabric backing! There are a number of reasons that this can happen but with the lining I did not think it would be an issue here! It was really very sad and I had to put the bear down for the night and walk away!

Now I also know that no matter if I get through the second bear that I cut out of this coat or not I will not be making fur bears at this time... due to the sneezing and eye burn! So I want to let you know that I have a few beautiful fur coats that have been prepared for bear making that I will be getting rid of! I have a Persian lamb and I also have a GORGEOUS silver fox so if anyone wants them and wants to pay the shipping they are yours - just contact me!


Thursday, March 29, 2012

Cake layers

I am up early to sneak onto the computer to get this post done for you all so my husband can get back to work this morning before we head into the office! The jobs all come at once... you know how it is!

Okay so back to the WAFER CAKE:

Today we are going to do the layers. You have already made your Cooked Sweet Milk and it has cooled over night. So now get out your mixer or you can do this by hand if you wish but I LOVE my KitchenAid mixer.

Start by putting your cooked sweet milk into the bowl and add a half a stick of butter. Mix until well blended!

While that is blending get our your Waffle Wafers and get one ready with Waffle side up. I placed mine on some nice parchment paper on a cake carrier. There are two sides to your waffle sheets and one is smooth; the smooth side should be down and the waffle side should face up to you.

Once your sweet milk is nicely blended with your butter or margarine is fine as well (if you use margarine be sure to use baking margarine not tub margarine), we are ready to begin layering. our some of your milk mixture onto the wafer sheet and gently begin spreading your milk from the middle outward towards the edges! Make sure to get your filling right to the edges. I even let mine drip off a bit... that made it look really pretty anyway!

Using a really nice spreader knife is very helpful. Luckily my Mother In Law had one I could use but if you do not have one just use a nice butter knife. It will take a bit more time but it will work!

While I was preparing the next layers my Mother In Law read to me all of the Ukrainian traditions for Easter from her book... It was a really nice touch to the evening!

I made two layers with the sweet milk and the traditional way is to make all the layers this way but I wanted to incorporate a different layer that I thought we would all enjoy. So I made a chocolate and peanut butter layer. You cannot do this ahead of time... you must do it as you are about to use it if you decide to do this also as it gets too thick if it cools!

Taking 12oz of chocolate chips (any kind or style will do) I used a mixture for this cake of milk chocolate and white chocolate chips and a half a stick of margarine you want to slowly melt this on a double boiler. Make sure you stir constantly and do not have your heat too high or you will over cook your chocolate. Once mostly melted add a cup of peanut butter. Melt until smooth!

Now begin to layer again in the same fashion as before with your peanut butter layer. I did two layers like this on the cake.

Now finish he layering with the rest of your sweet milk! I used 1 1/2 packages of Wafers for my cake but you can make it higher or lower as you see fit! There are not rules to this!

Finish with a Wafer on the top with no filling! Now you need to place a nice heavy cutting board and a bowl of water or a heavy baking dish on the top and let it sit in the fridge over night... a minimum of two hours if that is all you have but over night is best! You need the layers to combine with the wafers and harden to hold the wafers together. The board and bowl help to keep your cake flat until they bind and harden otherwise your cake will warp and edges will curl!

You can count your cake as finished at this point if you like and simply let it cool and then serve cut into pieces but I wanted to make mine into a birthday cake so I wanted a top icing and decorations... I made a chocolate ganache for my icing! I only did the top of the cake as I wanted the pretty edges and layers to show!

For your ganache you need equal parts of heavy cream (Whipping cream) and chocolate... I used semi sweet chocolate for this.

All you do is heat your cream to a boil and remove from heat immediately. Have your chocolate in a different bowl waiting and slowly pour your hot cream over the chocolate. Mixing as you go and mix until the chocolate is completely melted! It will be thick and lovely! Now do the same thing as all the other layers and pour onto your cake top, smoothing it from the middle outward towards the edges. 

Let cool over night! It will be shiny and taste light and delicious!

Do any decorations the way you like and your cake is ready to serve! My Mother In Law did the top decorating with butter cream icing that she handmade... I was not feeling well so never got to see this part being done but here is the final image of the finished cake...

Everyone loved it... it was light and delicious and surprisingly not too sweet or heavy! A really lovely cake that I would recommend for any occasion! Easter would be a fabulous time for this cake!

I celebrated my birthday at the same time even though mine is not for a couple of weeks yet... April 5th when I will be turning 45yrs old. But I wanted to share the cake that was purchased for me this year! I requested it as I had never had an ice cream cake before... A Reese ice cream cake from Dairy Queen and it was FABULOUS and even better it went great with the Wafer cake too!

It was a really lovely day and I hope you will get a chance to try out the cake recipe too sometime. Just remember that although this cake is really easy to make... you need a few days to do it properly so this is not a last minute cake! But it is worth all the waiting!

Here is a piece for you... THANKS for joining me here to see how to make a traditional (with a twist) Ukrainian wafer layer cake!


Wednesday, March 28, 2012

More cake soon

Hello Everyone

There is only so much time in a day and today my time is up on this computer. My husband has a bunch of graphic art jobs that has needs to get done and this computer is the place to do it so I will have to postpone the rest of the cake until the jobs are completed! Hang in and I'll be back soon to show you how to make it and how it all turned out!


Tuesday, March 27, 2012

Pishinger and Dulce de Leche

Hello everyone:

First let me say thank you to all who adopted and all who participated in the Teddies Worldwide online show! I am happy to tell you that 4 tea cup pouches and 3 bears were adopted! This time around it seemed the traditional bears were the hit of the show, at least for Seraphim Bears anyway. It was super fun and I look forward to the Christmas show! Until then I will be working hard on other bears for Silly Bears, Colin's gifts, a very very special bear for a bear artist friend that I will keep a secret until Christmas and a few custom orders that I have to now get caught up on!

I will try to post photos when I can of course but some will have to remain a secret until release dates etc. I am going to get back to the fur bears now also but we are just at the sewing stage right now so there isn't a lot to show. I will when I get to a point where it's a bit more exciting... soon!

Now this weekend was my husbands birthday and as you know I am now the official cake maker. In my last post I made a typo and it said I was NOT and it was supposed to me the word NOW the official cake maker so just to clarify I AM and so I decided to make him a cake that was not of the norm. He loves the wafer cookies and as it turned out there was a cake that is traditional in the Ukraine (which is his background) that combined the wafers and his culture so I aimed to make that! The cake is traditionally called pishinger.

So to begin with I had to find the wafers, which I found at the Bulk Food store in the cake section! From what I saw online these are fairly difficult to find so I guess I was lucky in getting them! The ones I found were not coloured or round and fancy but they were fresh and rectangular which I thought would make a nice cake!

The next step was to prepare the Dulce de Leche as I wanted that as four layers of the cake filling. This was a tricky thing to make from scratch! I know that Presidence Choice products makes one but I wanted to make this authentic so I made mine from scratch!

First I had two cans of sweetened condensed milk and two canning jars. I transferred the milk from the can into the jars. Now you can apparently make this by leaving the sweet milk in the unopened can but in today's day one never knows what coatings they have in cans etc. and seeing as how you have to apply heat to cook the milk I opted to change containers to glass. Not to mention that the can can apparently explode is one is not careful! I opted out of this possibility.


Once the milk was transferred, you need to hand tightened the canning jar lids so they are as tight as possibly but only with hand strength no tools!

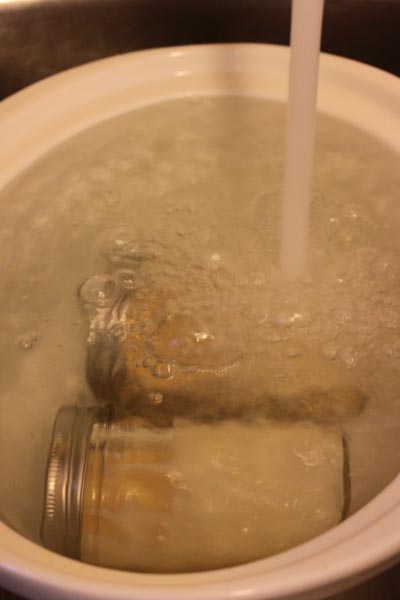
Now you need to place them gently into your crock pot and make sure they are completely submerged into water... cover well with the water!

Now once they are in the water you are going to put your lid on and lock it down... mine locks but if yours doesn't just put the lid on as you normally would for your crock pot!

Turn your crock pot to LOW and leave to cook for 6 to 8 hours! I have to admit, I had to leave mine alone in the house with just my animals and I was nervous all day long but all went well and my milk cooked with now catastrophes! I think this is a much safer way to go than cooking it in the can on the stove! The temperature is more easily controlled also!

Once the eight hours has passed, turn the crock pot off and carefully bring it to your sink and pour off the water. Remove your sweet milk canning jars and allow them to cool completely before opening! Your sweet milk will be a lovely caramel shade and I know you will be tempted to just get a spoon right away... no tasting till cooler!

Then your milk is ready for your wafer cake layering! So as you can see this cake is not a quick make! It took us four days altogether to get it completed. I will post tomorrow with the beginning of the cake making!


Friday, March 23, 2012

Fur Friday - Postponed due to online bear show

Hello Everyone:

I just wanted to let you all know that today's Fur Friday post will be postponed till next week as this weekend ... Starting today at 4:00pm Eastern Standard Time, the Teddies Worldwide Bear show - Teddy Bears Tea Party is beginning and Seraphim Bears is exhibiting!

I look forward to seeing you all there and I will have 8 bears to offer in the MINIATURE category! Two are a bit larger in size but most are minis!

Here is your link to the show:

TEDDY BEARS TEA PARTY

I will be back next week with a proper FUR FRIDAY post!